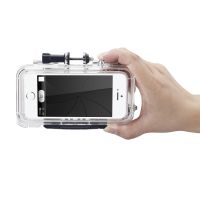
| 材质:PC | 风格:运动 | 品牌:中性 |
| 适用品牌:苹果 | 工艺:注塑/注射 | 外型尺寸:4寸 |
| 颜色:透明 | 适用型号:iphone5s/5 |

The multi kits widens the held of view of your iPhone5/5s camera. But it cannot improve image stabilization beyond that of the hardware and software version of your particular iPhone. Whenever possible we recommend updating your device to the newest IOS for the best results. While the mounts are built to be secure and stable, some activities and your ability level may generate more vibration than optics and image stabilization can handle. In these scenarios you can isolate the multi kits from vibrations by mounting it on your body with a chest harness or helmet mount Try different solutions to find what works best for you.
1、厂家货源***
厂家直销 大量库存
2、关于尺码
3、关于颜色
4、关于客服
5、关于售后
6、关于发货
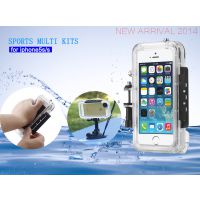
Features
The sports multi kits is a hardware solution for Phone 4/4s&5/5s that includes a wide-angle lens, a built-for-impact case and a mounting system. It turns your Iphone into the ultimate wide-angle sports camera.
1. Built-in, wide-angle glass lens gives your already great iPhone camera an even better perspective of the activity you’re filming.
2. Hard-shell case securely protects your iPhone from knocks, scrapes and bashes.
3. Soft interior cushions your iPhone from hard blows and keeps vibration to a minimum.
4. Action button lets you start recording without needing screen access, keeping everything sealed up and your iPhone safe and protected.
5. Multiple mount options let you choose how and where you mount to best capture your activity. A bunch of mounts are already included end additional mounts can be purchased separately to customize kits to your needs.
6. The angle-lock feature on all our mounts makes sure kits stays positioned exactly where you put it. No more finishing an epic run only to find your camera in a completely different position than when you hit record.
7. Interchangeable case backs** let you choose whether you want access to the home button and touch screen, or a fully waterproof enclosure. Choose what’s appropriate, as you need it.The Dryland back allows access to the home button and screen with a tight seal against the glass providing one-touch access while keeping unexpected splashes at bay.The Watersports back makes fully waterproof so splashes and even full submersion are no problem. It’s IP68 tested and ready when you are.
Compability
The multi kits is built specifically for iPhone 4/4s&5/5s and will work with all carrier versions.
Note: The multi kits widens the held of view of your iPhone&4s camera. But it cannot improve image stabilization beyond that of the hardware and software version of your particular iPhone. Whenever possible we recommend updating your device to the newest IOS for the best results. While the mounts are built to be secure and stable, some activities and your ability level may generate more vibration than optics and image stabilization can handle. In these scenarios you can isolate the multi kits from vibrations by mounting it on your body with a chest harness or helmet mount Try different solutions to find what works best for you.
Opening Multi Kits
1. Pull up on the clasp release at the top of the case and then swing the clasp latch op. (It may be necessary to hold the case slightly closed with your other hand)
2. With the lens-side door now free, use the thumb tab to swing it down for full access.
Loading Your iPhone
kits, place the screen side of the iPhone into the deep-side of the case. Lead with the volume buttons so that they properly seat on top of the multi kits action button. Your iPhone camera should now be opposite the multi kits’ wide-angle camera lens, and you’re ready to close the case.
Closing Multi Kits
1. Make sure all gaskets and internal pads are seated properly, and your iPhone is properly installed (if inserted) before closing the case.
2. Close the case slowly making sure the leading edge of the gasket enters the other side of the case smoothly.
3. Inspect all 4 sides for gasket alignment. The gasket is designed to easily show a bad seal. All smooth inside? - it’s good to go. Pinched in the door? - close once more.
4. Swing the clasp latch over the lens door’s catch then close the clasp. (It may be necessary to hold the case slightly closed with your other hand)
Removing Your Iphone
1. Follow the steps above for opening the multi kits.
2. If using the WaterSports Back, you may need to gently tap the case until your iPhone leans forward and can be pulled free.
3. If using the DryLand Back, you can push on your iPhone through the screen opening on the multi kits. (just remember to have your other hand ready to catch)
Decide Which Case Back to Use
It’s easy to change between a waterproof enclosure and screen
access by switching the backs on your multi kits.
1. Open the multi kits until the front door is 90° to the back door.
2. Hold the multi kits so the open side is toward you with the back case securely in one hand.
3. Grab the front door with your other hand placing your thumb at the corner by the hinge.
4. Push with your thumb and twist away from the back case to remove the door.
5. To install a door, line up the hinges with the front door at 90° to the back door.
Press firmly with your thumb on each hinge until you hear a satisfying snap as it locks into place.
7. Confirm the door is properly in place by closing the multi kits and checking the seal.
Note: To keep your iPhone as dry and safe as possible, we’ve purpose- built the WaterSports version ofmulti kits with the minimum required access for recording. Once in the case, you’ll only have access to the volume (+) button for activating the recording function. You will not be able to access the power, home button or touch screen. This means your iPhone needs to be on and in record mode BEFORE you close the case. Likewise if you’re using the DryLand version, but you’ll still have the screen and home button access you know and love so powering up is a bit easier.
Note: Two adhesive panels are included to help reduce moisture and prevent fogging if you will be using the multi kits near water or in a moist climate. These can be used a few times if dried out between uses. Just peel and stick to the square areas on the inside of the multi kits. Store in a plastic bag if not used.
Recording your first activity
1. Make sure your iPhone is powered on and in record mode.
• for Dry Land case:
- Press the home button and swipe to unlock
- Launch the app
- Hit the camera icon to enter recording mode
• for Water Sports case:
- Find a dry pace to open the multi kits
- Turn on your Phone and launch the app
- Hit the camera icon to enter recording mode
- Return your iPhone to the multi kits and close it up securely
3. To start recording, press the Action button to the left of the mount.
4. To stop recording, press the Action button again.
Note: Your video will only be as clean as your lens. Check the lens surface inside
the multi kits for dirt and smudges before closing the case. Check the outside lens surface frequently since that’s exposed to your activity.
A Couple Notes about Recording Video With Your Phone
The iPhone has an amazing camera and is capable of capturing amazing video, especially when used with the multi kits.
• It’s easy to forget that it’s also a phone and designed to prioritize that functionality. If a call comes in while recording a video, the iPhone will automatically atop your recording to give you the opportunity to answer the call. This is a great feature for everyday use, but for capturing that epic downhill.., not so much. For this reason we recommend putting your iPhone into Airplane Mode before trying to record so that you can capture everything without interruption.
• Recording takes space, and depending on your capture setting...a lot of space. Make sure that you’ve got at least 4GB clear to avoid missing something epic.
• The iPhone’s microphone is behind a thick layer of polycarbonate when inside the multi kits.
You’ll notice that a fair amount of audio does get through, but it’s muted compared to recordings taken outside the case. You’ll also notice a reduction in wind noise at speed for the same reason. We think it’s a good balance and hope you agree.
Cleaning the Multi Kits
The multi kits keeps your iPhone safe from the elements, but needs your help to do so consistently. Please follow these tips to keep everything working well.
• The multi kits’ waterproof and dustproof seal is the key to protecting your Phone. Any dirt, grit, hair or other foreign item can keep the seal from working properly. Check it carefully before each use.
• After each salt-water use, the multi kits must be rinsed in fresh water to prevent corrosion to hinges and build up on the seal. For best results, remove the case seal, rinse the case and seal separately and allow both to dry before reinstalling.
• To remove the seal, gently pinch the exposed gasket from the edge of the front door between your thumb and forefinger and pull sideways away from the door.
• To install the seal, it’s easiest to remove the front door first. Place the gasket along the hinge side with the flat side down. Gently stretch each corner into place. Press and tuck the gasket firmly into place along all 4 sides and chase it with your fingernail if needed to ensure there are no gaps. It helps to chase each corner towards the center of each long side. Finish by closing the case and checking the fit.
• Don’t use any industrial cleaners to clean the multi kits. Fresh water should be enough for almost any scenario.
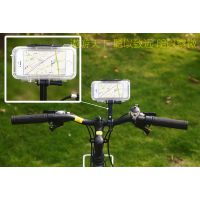
Cycle Mount Instructions
Mounting to Handlebar
Great for giving your viewers an idea of what you’re seeing.
1. Mount your multi kits to the top of the DogBone using the adjustment post knob that came with the multi kits. Use the hex wrench to tighten if needed.
2. Loosen the adjustment knobs at the bottom of the handlebar clamp until you can swing one side free through the open slot in the lower clamp.
3. Position the clamp on your handlebar where there is sufficient room for the clamp and your fingers for tightening the knobs.
4. Tighten the knobs until snug, then adjust the angle of the mounted DogBone extension using the adjustment knob at that joint
5. When everything is where you want it, go back and tighten all the knobs some wore.
6. Make sure to connect the leash to the multi kits and use the hook around the bar and back to the leash when riding.
Tips: Try pointing the handlebar clamp forward on the left side of your bike stew with the V DogBone aiming down. This hangs the multi kits upside down with the lens close to the centerline of your bike and keeps the multi kits out of your immediate vision.
• Try different positions to see what works best for avoiding excessive vibration during your riding and any suspension you may be running For best results, try to keep the multi kits clear of any cables that way rattle against it or appear in your shot.
Mounting to Seatpost
Face it backwards to see what you’re leaving behind, or maybe who’s right on your tail.
1. Remove the 1” DogBone extension by loosening and removing the adjustment knob and hex bolt at its base. Store these back in the case when not in use for safe keeping.
2. Mount your multi kits to the top of the Bar Mount using the adjustment post knob. Use the hex wrench to tighten if needed.
3. Loosen the adjustment knobs at the bottom of the handlebar clamp until you can swing one side free through the open slot in the lower clamp.
4. Position the clamp on your seat post where there is sufficient room for the clamp and your fingers for tightening the knobs.
5. Tighten the knobs until snug, then adjust the angle of the multi kits.
6. Make sure to connect the leash to the multi kits and use the hook around the post and back to the leash when riding.
Tips: Hang the multi kits upside down close to the underside of your seat. This should keep the multi kits out of the way of your legs. Make sure the multi kits is clear of any rear suspension travel. (just don’t get too far behind the saddle on those down hills)
Surf Mount Instructions
Mounting to a board, kayak or anything similar
1. Peel the red backing label from the Flat Mount adhesive and carefully position it in the center cavity of the Surf Mount Disc. Press and hold, then set something heavy on top for as long as you can manage.
2. Make sure the multi kits has the Thumb-latch Quick Release connected. Slide the Quick Release onto the Surf Mount Disc from the side that has a flat channel. This provides a little more working room for the thumb latches, although you can flip it 180 when wanted.
3. Move the multi kits and the connected Surf Mount around to a few positions to figure out where you want to attach it. (Position twice, stick once is our motto)
4. Clean the selected surface using an alcohol wipe or similar to get it as clean as possible.
5. Peel the red backing label from the Surf Mount Disc. Press and hold, and again set something heavy on top. (24 hours if you can manage)
6. Double check your mounts and tighten the case adjustment knob using the hex wrench if needed.
7. Make sure to connect the leash to the multi kits and use the hook to connect it to the Surf Mount when riding.
Note: After each salt-water use, the multi kits must be rinsed in trash water to prevent corrosion to hinges and build up on the seal. For best results, remove the case seal, rinse the case and seal separately and allow both to dry before reinstalling.
Flat & Curved Mount Instructions
Mount where you want...
1. Stating the obvious here. Flat Mounts are good for sticking to flat surfaces. Curved Mounts are better for curved surfaces (like helmets).
2. Make sure the multi kits has the Thumb-latch Quick Release connected.
3. Slide the Quick Release onto the Mount of your choice and keep in mind you can flip it 180 on the Mount when you want to.
4. Move the multi kits and the connected Mount around to a few positions to figure out where you want to attach it. (Position twice, stick once is our motto)
5. Clean the selected surface using an alcohol wipe or similar to get it as clean as possible.
6. Peel the red backing label from the Mount. Press and hold, and again set something heavy art top. (24 hours f you can manage)
7. Double check your mounts and tighten the case adjustment knob using the hex wrench if needed.
8. Make sure to connect the leash to the multi kits and use the hook to connect it to a non-mount location as a precaution.
Tips:Try to find mount areas as free of vibration as possible to help get the best video. Different surfaces and different material can yield dramatically different results
Tripod Mount Instructions
Tripods, monopods or any 1/4-20 screw mount
1. Make sure the multi kits has the Thumb-latch Quick Release connected.
2. Thread the bottom of the Tripod Mount onto the tripod you are using as far as you can.
3. Use the tripod’s adjuster function to take up any remaining slack and form a tight connection with the multi kits Mount.
4. Slide Quick Release onto the Tripod Mount and you’re done.
Warranty
We are dedicated to making the best quality products we can. To back this up, your multi kits is warranted for 1 full year from the date of purchase.
Warning
Read all instructions and warnings prior to using this product. Improper use of this product may result in product damage or excess heat for which damages you (“Purchaser”) are responsible.
Do not store product in high temperature environments, including intense sunlight or other forms of heat.
Although product is designed for high impact actthties, excessive crashes or impacts could cause damage. Check product before and after each use.
Make sure the inside of the case is completely dry before each use. To avoid moisture build up within the multi kits, especially when using the WaterSports back, use the provided anti-fog inserts.
When using adhesive mounts, thoroughly clean and dry the area you wish to adhere to before placing the mount Allow as much time for the mount adhesive to cure as you can allow and apply steady prolonged pressure. It can take up to 24 hours for a mount to fully adhere and set Check security of any mounts before and after each use.
Properly tighten all adjustment knobs and check for loose hardware before and after each use. Re-check after any crashes or excessive knocks and bumps.
Legal
This product is meant for use only in conjunction with the appropriate mobile entertainment device. Please consult your device packaging to determine whether this product is compatible with your particular mobile entertainment device. Manufacturer is not responsible for any damages to any mobile entertainment device incurred through the use of this product.
Manufacturer shall not in any way be liable to you or any third party for any damages you or any third party may suffer as a result of the use, intended or unintended, or misuse of this product in conjunction with any device or accessory other than the appropriate mobile entertainment device for which this product is designed. Manufacturer will not be responsible for any damages you or any third party may suffer as a result of the misuse of this product as outlined previously. If you are responsible for product use with an unintended mobile entertainment device and damages result from such use, you agree to indemnity Manufacturer for any resulting injuries to any third party(ies).